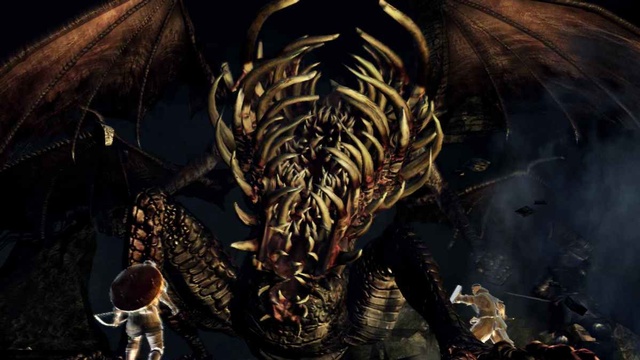
HP: 4401 (Standard Game)
Souls Awarded: 25000 (Standard Game) 75000 (NG+)

The Gaping Dragon is the boss in the Depths, and gives you the key to the upper entrance to Blighttown.
Note that this boss is optional withthe Master Key as one's chosen gift during character creation, which can be used to enter Blighttown through the back entrance in Valley of Drakes. This is most easily accomplished by simply taking the elevator down from underneath Firelink Shrine, and then circling around into the adjacent building, unlocking the barred door with the Master Key, and then proceeding across the narrow footbridge into the dark cave on the other side. Blighttown's back entrance can also be accessed from the Darkroot Basin entrance into the Valley of Drakes without the Master Key. Enter the valley either by taking the elevator down from Darkroot Basin, or kill Ingward and enter from New Londo Ruins. However, that route is more circuitous and requires you to fight or evade some powerful enemies in the Valley of Drakes in order to double back to the Blighttown cave entrance.
It is also possible to summon certain NPCs to assist with this battle if you are in human form and do not already have 2 player summons assisting. Solaire of Astoria's summoning sign can be located on the floor directly above the short staircase leading down to the boss fog gate. Knight Lautrec's summoning sign can sometimes be found very close to the location for Solaire's, but on the other side of the adjacent pillar (up against the back wall, in the same general area as where the heavy crossbow may be found). Both NPCs are effective during the battle, but Solaire's ability to keep his distance and throw lightning spears may be preferable.
Note: Both phantoms can be summoned at the same time. Having both makes the fight a lot easier since all you have to do is stay out of the dragon's way and pummel it from behind.
Strategy (no shield) (skip to 12:10)

Abilities
Engorge: The boss will rear back and then slam his exposed ribcage into the ground in front of him, doing massive damage, and stunning himself for a few seconds. This also exposes his head, which causes him to take extra damage when attacked, however, he will almost always follow this with his dash attack.Dash Attack: The boss will use this attack after Engorge. The ground begins to shake, and he will run about halfway across the room before stopping and catching his breath. When the dash ends you get a chance to attack.
Float Attack: Sometimes the dragon will will float up to re-adjust his body so that he is facing you. When you see this sprint away from him and wait for the dash once again.
Freak-Out Pound: After he lifts his head back up, he will sometimes freak-out and repeatedly attack in front of him. At lower levels, this will most-likely kill you in one hit.
Acid Throw-Up: You have to watch for this as you're attacking the tail. He will sometimes squat down, and an acidic goo will begin to cover the floor within a large radius around him, which will quickly reduce the durability of all equipped items. In order to dodge this you must simply sprint as far away as possible.
Tail Swipe: If you notice the tail start to move as you're attacking it, you must roll away, or block with your shield, as he is about to preform a tail swipe. This is a low damaging attack that hits in an arc behind him and somewhat to the sides. Although individually his tail swipes are mostly an annoyance, on rare occasions he will start spamming them. As they have a large attack arc including parts of the sides of his body, this can be dangerous if you are staggered or knocked down by the first one. Cutting his tail off as soon as possible when the fight commences makes the overall battle much easier, as he doesn't seem to realize his tail is gone and will continue trying to hit people with it, which provides great opportunities to deal damage to him.
Kick: He will occasionally kick the area in front of him after lifting his head up. When he is moving (even just turning in place) his feet can also stagger you and cause minor damage.
Grab: If you are standing near one of his arms, he can grab you and eat you. While you are in the dragon's grasp (or mouth/ribcage), begin rapidly pressing L1/R1 to escape (such as R1/R2 on the PS3). Doing so rapidly can permit you to negate damage entirely, while not pressing buttons will result in death.
Strategy
When you first enter the room, keep your distance. Either let Solaire or Lautrec (if summoned) run up and tank the boss, or grab the aggro and wait for it to drop its head and to start to do a dash attack. (The ground will start shaking when he does this). After he starts to dash just keep to his left or right to avoid being hit; after this, run behind him to his tail. He will hit the wall and be stunned for a few seconds, this is your chance to do some damage and hopefully cut off his tail. Repeat this, and you should be able to whittle him down without taking any damage. The only change in this fight is the Acid Throw-Up he begins to use when he reaches 33% health.- By cutting off his tail he can no longer attack you with it, also drops the Dragon King Great Axe. Note that only part of his tail can be cut off, and attacks on the portion closer to his body (i.e., the stub that remains if the tail is removed) will not cut the tail off, and will just do damage normally. There is a noticeable ring around the tail at the location it can be cut off; attack the tail below that ring to cut it off quickly.
- NOTE: If you are directly behind the boss and within melee range, there is a slight chance that the remaining stub of his tail will hit you.
- Players should make sure to run from the yellow acid it breathes out onto the floor, which corrodes equipment quickly. The acid radiates out from the dragon quickly and for a fairly long distance, so retreat immediately as soon as he winds up for this attack. Thankfully, the leading edge of the spreading acid seems to cause far less corrosion than being fully engulfed by it. Note that the acid can damage all equipped items, including weapons or talismans/catalysts/pyromancy flames that are equipped but not in active use. Having the means to repair at least your primary weapon, such as some repair powder, can avoid the risk of having to go into your inventory to equip another weapon or item during the fight.
- The yellow acid seems to act as a sensory locator, as Gaping Dragon seems to charge in the direction of where the player was at the time of the breath. Keeping a good distance and moving immediately after the fluid dissipates will allow you to get into position more quickly after the charge. This could possibly also be due to the attack lowering its head, as it doesn't appear to have eyes in its ribcage.
- Being able to roll well and sprint faster can really help in this combat, so don't overburden yourself with heavy of armor. The Dark Wood Grain Ring makes the fight significantly easier.
- One basic thing to note which makes avoiding him easier is that when he is standing upright he can be outrun but has a sharp turning radius and is very hard to move behind, but when he is on all fours he is impossible to outrun but has a terrible turning radius. For a ranged fighter, positioning yourself safely out of his reach based on his two stances is just about all you need to know to easily solo this boss.
- Another easy way to defeat this boss is to wait until he rears up and then charges you, lock on and use sorcery or pyromancy to take out part of his life. Rinse and repeat. Keep clear of legs when charging.
- If you wish to summon player phantoms to help you complete the fight, the most common location for signs is around the Depths bonfire. Clearing parts of the Depths and opening the locked door shortcut adjacent to the Giant Rat in advance makes it very easy to return to the bonfire and pick up additional player summons as desired.
- Summoned phantoms DO NOT have to enter the fog gate to engage this boss. If you are a summoned phantom and are proficient with bows, just wait on the balcony and pump the dragon full of arrows from safety while the host engages the dragon. The dragon will often aggro to the bow user, allowing the host to kill the dragon from relative safety (once the tail is cut off).
- A strategy which can avoid damage all together is baiting the dash attack. After the 'engorge' front slam, which can be baited even when standing out of range, running round the side and running up to his tail region once the charge has finished allows you to get in a few seconds of attacks. Then run away out of range and rinse repeat. A surefire strategy simple even to the newest of Dark Souls players.
Video Stragtegy NG+ (skip to 7:30)

Hints
- Remember to take out the Channeler before you fight this boss. There is a Channeler located near a group of large rats near the top of the wall overlooking the eventual boss fight area, beyond a small fog gate. If he is not killed prior to the fight with Gaping Dragon, the Channeler will continuously fire soul arrows at you, and may also buff the Gaping Dragon if it gets close enough to him, making it significantly stronger. The Channeler's combat spells are not particularly dangerous by themselves, but have a frustrating tendency to hit you in the head from above and stagger you just as you are attempting to either run at or roll away from the Gaping Dragon. Killing the Channeler should be a priority prior to tackling the boss. To reach him, from the Depths bonfire, take a right outside the bonfire room and go down the stairs and past the down ladder, into the waterway filled with rats. Take a left down that waterway (past the rat-in-a-box trap at the end), then drop down and head into the passageway beside the stairs. Proceed straight (ignoring the opening to the right leading down to a drain), and after a right turn you will approach the fog gate with the Channeler beyond it. It is also possible to kill the Channeler with arrows from below, near the corner that extends out along the path leading to the down stairs to the boss gate. The Channeler is several levels above you, so keep looking up as you walk and you can see him. He may shoot back, so use the pillars or a long distance bow/Hawk Ring if you have them.
Drops
- 25,000 souls
- Blighttown Key
- 1 Twin Humanities
- 1 Homeward Bone
- Dragon King Greataxe, by cutting of its tail.
Load more
